Sunday, August 28, 2022

The Tower of Cirith Ungol


In this part of the build, the terrain build was completed and the back-lit shadow of the tower of Cirith Ungol was added.

Molding the Left Wall

The completed part of the scene was covered in plastic wrap so that when dry, the two parts can be separated again for painting, wiring and other setup activities.

The plastic wrap is loose fitting.

Then the left wall was installed with pins and gently clamped to remove any bowing, forcing the walls to look square.

The gap was then filled with Sculpta-mold and set aside for a few days to dry.


The Upper Rock Faces

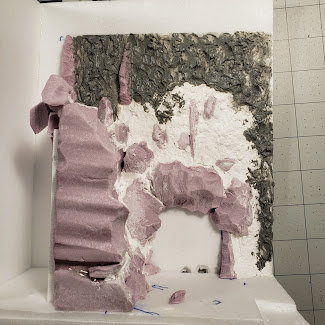
With left wall dry, the nook can be disassembled and any missing rock feature texture added. For this step latex caulk was used. It is harder to work with than sculpta-mold but has a longer working time and dries much faster (overnight).  The texture shown here is achieved directly with the nozzle of the caulk tube. 

The left wall with latex caulk texturing. 


The right wall with latex caulk texturing.


Getting very close.


Finishing with Sand

I have a small container of sand I use to add fine detail to terrain.  The sand is irregular and has small pebbles and various grain sizes.

container of sand

To apply the sand I use PVA glue (Elmer's) and a little water on my brush.  Alcohol (rather than water) might work better to seal the sand with glue afterwards but since we will be painting the sand, this is not necessary and the whole piece is sealed in another step.

Glue for the sand

The surfaces where rubble would collect are then painted and sprinkled with sand.  Shaking/sifting the sand in the cup causes different sizes of the sand to separate out (larger to the top) and you can select the more fine layer for application to the ground surfaces and the larger pieces to fill in areas at the base of the walls/cliffs.
Left wall has some more texture.


This terrain looks done!


Sealing

To seal the terrain piece, a popular technique of mixing Matte Mod Podge with black paint was used.


Once sealed the contrasting surfaces and textures look very uniform


Painting this will be easy!


The Tower Silhouette

The Tower of Cirith Ungol is supposed to be in background overlooking the path.

A black cloudy skyline was painted on a small piece of photo paper.  Photo paper was chosen because it heavy and sealed.  It is less likely to be deformed but the wet painting process, and will accept and hold a curve when fit into the back of the book nook box.

A template was created from cardboard in the shape of the tower and painted black.
 
The Tower and hillside cut from thick cardboard.

The pieces easily slide inside the box and fit without glue.  Using a single red LED something approximating the final configuration was possible.

Prototype back lighting.

Next Steps

  • Terrain Painting
  • Silhouette lighting
  • Samwise installation / lighting
  • Front scene lighting installation
  • Wood Box Shell
  • Miniatures and frame installation
  • Arduino Nano light programming and finalization

Wednesday, August 17, 2022

Stairs to Cirith Ungol


The next step in the build is to build the box, finalize the placement of the miniatures, plan the surrounding terrain and begin building.

The Box

I use Dollar store foam board (Readi Board) for nearly all of my booknooks.  I cut out the sides, bottom, back, and top then assemble the bottom, one side, and back panels with hot glue (make sure to first remove the paper from the inside surfaces).

My Lord of the Rings Book Nooks are 9cm wide, 21.5cm high, and 20cm deep.  This odd set of dimensions does not match my books and the height is basically a mistake...  but once you build one, they all should match.

I forgot to photograph the empty box, but you get the idea.


Miniatures Placement

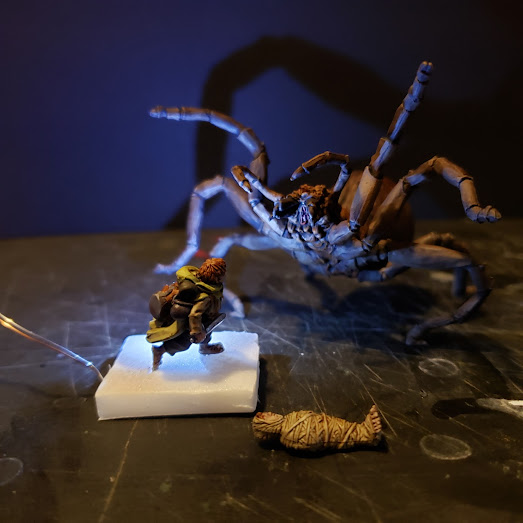
The miniatures are quite tight as Shelob is roughly 8cm across!!


Achieving the desired angle for the Shelob Miniature means I need to cut the box or the end of a leg off the mini.  I opted to cut the foam.

Terrain Layout

To give the illusion of more space for the battle, I am going to pull all the miniatures to the very front of the box, and make it look like there is a dark cave on the right side where the leg vanishes. This position will also allow natural light from the environment (my room) to illuminate Sam and Frodo, while the Light of Elendil can illuminate Shelob and cast some great shadows.

Then we need the battle to happen in front of the stairs and in full view of the red lit window of the tower of Cirith Ungol. To get the tower inside the nook, I'm going to try building a "shadow box" type illuminated free standing 2D background layer for the far hill with the tower against a backdrop of black clouds lit by moving reds and oranges (good luck!).

Terrain Building

With a layout in mind I started stacking and hot gluing PVA foam rocks and chiseling out stairs while leaving room at the back for a back lit tower.


Then the loose fitting stones are smoothed together and the wall textured with Scuplt-a-Mold.


Getting close!

Next Steps

  • The left (open) side wall of the nook needs to be finished with rocks and texture.
  • Sand, rubble, and texture for the ground
  • Painting
  • 2D Tower and backdrop with lighting


Booknook Cover How To


The booknook cover (frame or face plate) involves printing out your design, gluing it to a backing material, and cutting it to shape.  I like to do this step early because it really helps mock-up the nook at all intermediate steps.  The key point being that you can skip certain details or rearrange things if they will not be visible or prominent as seen through the window in the frame.

I have a stash of thin blank cardboard which I saved from a series of Gundam robots I built with my some over the past 10 years or so. Alternatively, my first booknooks used the stiffer cardboard backing from a pad of paper. And failing that, you can buy this type of "Chip-board" cardboard from a craft store.

I use standard PVA glue, Elmer's glue (not the "School Glue") and spread it with a brush on the cardboard to a size quite a bit larger than the design I'm cutting out.

Spread the PVA glue to a thin layer

Apply your printed design

Now you need to cut it out with a hobby knife.

cut out the inside first (the frame has more support when you do this step first)

Completed cut out.

Sunday, August 7, 2022

Gilthoniel A Elbereth!


The models for the "Sam did not Wait" booknook have been primed, painted and LED installed.

Phial of Galadriel

The Samwise figure is carrying the Phial of Galadriel and it is about the same size as a mico LED, so it was removed.

 before

bulb clipped away

example LED placement

Priming


The models were primed first with a cheap flat black spray paint (Home Depot Quick Color) then dusted with Games Workshop Corax White primer leaving contrast in the recesses.

Painting


I used mostly Army Painter (AP) speed paints for the figures and I was able to paint them very quickly.

Frodo

  • webs = AP Speed Paint Pallid Bone
  • skin  = AP Speed Paint Crusader Skin
  • hair bits = AP Speed Paint Hardened Leather
Then Games Workshop (GW) Agrax Earth Shade (earth tone wash) was applied used to the entire model.  This was very fast!

Shelob

  • face & thorax = AP Speed Hardened Leather
  • abdomen and legs = AP Speed Paint Gravelord Grey (2 drops) Hardened Leather (1 drop)
  • mouth and eyes = AP Speed Paint Blood Red
Then Games Workshop (GW) Agrax Earth Shade (earth tone wash) was applied used to the entire model.  This process was very fast considering the size of the model!

Samwise

This was a longer painting project which started out looking "okay" and finished "better."
  • skin  = AP Speed Paint Crusader Skin -> this came out horrible and was touched up with traditional acrylic paints from GW for skin color. 
  • hair, backpack, leather straps and bags = AP Speed Paint Hardened Leather
  • shirt = AP Speed Paint Pallid Bone
  • pants and pots & pans = AP Speed Paint Gravelord Grey
  • Sting = based in a custom mixed light blue then light coat of Vallejo Silver
  • cloak = GW Elysian Green brightened by a white paint. 
GW Agrax Earth Shade was applied to most of the model.  But the face did not take this well.  The feet look dirty, but the face no longer read the as the right color.

This issue was compounded by my errors in two failed attempts to super glue the LED in place. A good bit of the paint was pulled off by handling the model, and the super glue running too far away.  So I had to custom mix most of the colors to touch up the model.

Since the model is going inside a dynamically lit booknook, we really do not need to spend much time on the minis (or even pain the back sides!).  But Sam is likely to be right at the entrance to the nook so apart from the far side of his face, I wanted him to look "good."  I am happy where he ended-up under my magnifying glass, but he does not stand-up well to a camera.


you will never see this side
(final wire placement is by the foot and almost invisible) 

LED Completed

The base of the booknook will be two layers of Dollar Tree Readi-Board foam core.  So I mounted Samwise into a piece of this foam and bent the pin in the front foot, and the wires from the back.

I use these micro LEDs which I get from Amazon which can be bought in different quantities and color combinations.  As a single purchase, they are expensive if you are building just one booknook but if you have several projects planned they are quite reasonable.

The white LED is a cold white and works well for star light.