Monday, November 27, 2023

Arcade1Up Coin Door lit push button mod


Working lit coin (return) buttons!!!

Step 1: Cutting the Holes

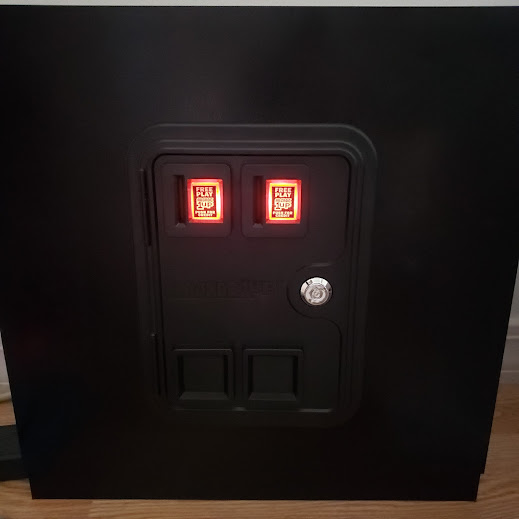
Remove the coin return plastic parts and replace the coin door on your panel.


  Use a sharpie to trace out the rectangles and remove the panel

I don't have a drill press so I created a jig to keep my drill straight. This is just a piece of wood pre-drilled with the same bit.

I also clamp everything tightly to a scrap piece of wood to keep my holes clean (e.g. avoid tearing the back of the panel up when the drill punches through the back side).


Before drilling with the 1-1/8 inch forstner drill bit the jig looks like this.


Step 2: Mounting the Buttons

I used these white 12V LED Buttons from T-molding.com.

Speciffically I used "White LED Pushbutton - Black Bezel" found here here.


They say they mount in a 1 - 1/8 hole.  But they are quite a bit smaller and at first I was disappointed. However, this is actually a VERY good thing for this application as you will see in a moment.

Mount the buttons in the holes using the black mounting washer to raise the button off of the surface of the panel. If you do not raise the button off the surface in this way, then the coin return button will travel too far and fall out of place.

Then loosely attach the buttons in the rear and re-mount the coin door with the coin return buttons sitting loosely in in place (without any screws holding them).


And this is the point where the over-sized holes helps you. shift the position of the button within the hole until the coin return button sits on top of the button nicely and returns to its proper position after a button press, firmly tighten, then reconfirm the button action of the front panel.

This step can be frustrating, and if the first 4 buttons I had done had not worked perfectly, I might have second guessed the process on the cabinet I show here. But I managed to find the right spot after about 5 minutes of micro adjustments and get it tight. It works great.

Note: These buttons will never be fool proof as there is not a proper prismatic joint keeping them in place. So you absolutely can push them too far and slide them a few millimeters out of the hole and into a "locked down" position. This will not really happen accidentally, is easily and immediately undone with a second press, and the overall feel of the buttons is quite good! 

Step 3: Hook up your buttons

Since the coin door is far from the other buttons, I opted to just use another USB joystick encoder to keep things clean and modular.

And the power required for the LEDs I used is 12V so this works automatically with power split off from the A1Up cabinet's power supply.


The completed cabinet!

Happy building and enjoy!

Sunday, November 26, 2023

The Demon of South Hollow

I finally broke out Four Against Darkness again and ran a quick dungeon to get reacquainted with the rules (not hard at all). What follows it the account of Thorbin (dwarf), Dantrag (warrior), Arthrallan (elf) and Brandall (wizard):

Introduction


The party has been sent to investigate tales of a nightmare fiend hunting the townsfolk of South Hollow. Actual sightings are more rare than the disappearances and remains, but those who witnessed attacks in the dark describe a grotesque silhouette with leathery wings and burning red eyes.

Ancient ruined fortifications with a sprawling underground complex are not far from town. This is the most likely place for such a beast to make its lair. Several hunting groups have come to the same conclusion and entered but none have returned. The party accepts the blessings of the townsfolk and sets out on a bright clear morning to investigate the dungeon.

The Dungeon


The entryway is quiet. Thorbin smells treasure to the left and leads the party onward.

Arthrallan the elf agrees that the healing water in the hallway fountain is a rare treasure and the party presses on.

Through the next door the party is surrounded by the animated skeletons of another adventuring party!

Arthrallan shatters a skull with an arrow, Dantrag crushes three with a massive sweeping stroke, and Thorbin cuts down the last one.

It appears these skeletons were recently picked clean by something... And that question is answered in the next room where a swarm of fat rats threatens to envelope the party (15x).


The rats are vanquished without incident.

Choosing the North door takes the party through an empty room to another room with a healer. None need his services, and he is directed to the exit along the path which was just cleared.

Moving through another two empty rooms at the top of the dungeon, the party turns South and encounters some hobgoblins. [I actually bought some retro style Hobgoblin models from Reaper for exactly this purpose.  I need to paint them!]

One of the hobgoblins was carrying a staff of sleep which Brandall the wizard is quick to pick-up.

Moving through two more empty corridors. the South path connects back to the already explored part of the dungeon. Turning East is a branching corridor where the party is not surprised to find a small band of goblins.


And more Hobgoblins in the next room.


Moving North, there is a massive room filled with orcs. Brandall is ready with an epic sleep spell, but it completely fails and Thorbin is lightly wounded in the exchange with the orcs.


Not wanting to leave a room in the middle of the dungeon unexplored, the party turns West and encounters a statue in the hallway.

The dwarf smells gold in the area and searches the statue. Suddenly the stone statue is a hulking jet black crimson eyed gargoyle which rakes two razor sharp talons at Dantrag and landing with one of them!


The narrow corridor allows Arthrallan cover to draw and shoot his bow over the dwarf, and he does with great effect. Brandall senses the magic resistance in the creature and lifts his lantern high to help the only way he can.

It is then that Thorbin lands a mighty blow with his two handed battle axe, sending the creature reeling backwards. But the gargoyle recovers with a supernatural speed borne of its magical nature and is immediately on top of the dwarf raking painfully with both claws.

Seeing the exposed flank, Dantrag lunges at the gargoyle with his sword and runs it through. And with that the combat is over as suddenly as it had begun.

On his feet now, Thorbin digs up a small cache of gold from behind the statue base while Brandall gives a small dissertation on the nature of gargolyles. This mighty gargoyle bares the marks of being in the service of an evil sorcerer and no doubt the gargoyle was the boss of this dungeon. The gargoyle likely called upon his master to animate the undead skeletons encountered near the entrance, and was gathering the goblins, orcs, and hobgoblins for some kind of larger conquest in the service of his master.

Epilogue

The party exited the dungeon without any further encounters and the the full map is here.

It is likely that had I played the rules correctly, the statue monster "Boss" was not supposed to be the "final boss" monster. It was not encountered in a room and not actually from the boss tables...  However, I did check if he was the final boss and after rolling a natural "6" I was not about to back-track on my decision. And I think I ended up with a decent story as well.