Wednesday, December 20, 2023

Streams of Silver - Terrain


The terrain came together quickly.


Dowel and toothpick branches were added to the tree tube and a bark texture applied to all with a hot glue gun. The hot glue was applied in vertical lines and smoothed into a bark texture using the side of the hot glue gun nozzle.


The base was then lifted and shaped into a circle in the back to support the eventual smooth mountain landscape background.

The terrain was improved with what will be a forced perspective background hill and organically shaped with Sculptamold.


And in a final step, the surface hosting the miniature was built-up to make a more flat surface and conceal the base.  


Friday, December 15, 2023

Streams of Silver - Cover Plate


In GIMP, I traced the title font from a high resolution photograph (surprisingly I could not find a better image online).


Then I replaced the title on the the SVG cover file I created for my Crystal Shard Booknook and changed the color gradient to match the spine and back cover.

I printed it, glued it to some a cardboard stock (with PVA glue), and cut out the shape with a hobby knife when it was dry.

The result allows me to frame the scene properly!


Before, I was concerned about adding too much elevation to the base. Looks like I can increase the height of the foam base and bring it forward a bit as well. But it looks like there will be very little guess work from here!

Sunday, December 10, 2023

Contra Arcade Cabinet (Arcade1Up Conversion)

Over the summer I bought an Arcade1Up Simpson's cabinet and converted it to a vertical screen Contra MAME cabinet.


The Simpson's Cabinet


I got the cabinet when it was on sale at my local Best Buy for $300.  I felt this was worth it because:

  • It has a nice scale and form factor complimenting my existing Golden Axe cabinet.
  • I would not have to do any woodworking on the cabinet.
  • BOE 4:3 LED screen.
  • Lighted marquee.
  • Two yellow button coin doors (needed for my Golden Axe cabinet)
  • PCB and control panel (traded for another red button coin door)
  • Stool (sold for $40) 

Graphics

Marquee and control panel

I got this excellent custom "Slip-On" Marquee from Szabo's Arcades. 

The control panel graphics are from Arcade Graphix and are printed on a thick laminated vinyl which avoids the need for a custom deck protector.


The sides were lightly sanded and painted with Behr spray (lunar surface color) and a generic glossy black spray paint went over the yellow trim.

The graphics were found on Redbubble.com and looked a lot better than the silly beefcakes Konami used in their artwork. We all know this game was supposed to be Dutch and Rambo versus the xenomorphs from Aliens... so why not? I also ordered a large Contra image for the Riser (bottom Contra logo).


Screen Rotation

I used a router to cut a vertical slot for the screen in the existing horizontal mounting [Note: this is actually the screen from my Golden Axe cabinet, as I did a screen swap over there because I preferred the mostly blank bezel graphics].
To complete the rotation, I purchased a piece of lexan, cut it to match the size, drilled holes for the attachment screws, and spray painted the back-side black (after masking the viewing window).
Lexan was a good choice here (3x more expensive) but it cuts and drills very easy.
Masking the window for the screen with Blue 3M painters tape was a mistake though. The paint left a residue and I kind of micro scratched the screen cleaning it off. It looks great, you don't see it, and I'm not complaining. But I would do it differently next time.

Power Distribution and Wiring

I mounted the display control board to the back of the monitor using a 3D printed template I found on Thingiverse. This does not actually fit the board correctly, but was forced to work and screwed into the back of the monitor using some screws used on the original PCB housing and my own collection of random screws.

The LCD control board is not connected and instead two buttons on the top panel the cabinet are connected to control the output volume.
The volume buttons on the top of the cabinet

Sound is wired to use the original A1Up speakers as driven by the display board and communicated from the PC over HDMI.

A single 12V power supply provides all of the power in the cabinet. The original cabinet was 3A 12V and the mini PC was 3A 12V.  So I bought a single 6A 12V supply from Amazon.


The 12V power is distributed to the various components in the cabinet via a terminal block which can also be found on Amazon.


Control Panel


The control panel was custom built from 1/2 inch MDF and black T-molding. T-molding, buttons, and joysticks are all from t-molding.com.  Sanwa sticks with red tops, red Suzo Happ concave buttons, and white P1 and P2 buttons. The USB encoder boards from Amazon came with all of the wires used here.

The lighted coin door build is documented here. Since I swapped the dual coin doors for a single panel, I took the front panel from my Golden Axe cabinet, made the modifications and hit it with the same black spray paint.

Mini PC


I bought a BeeLink mini PC and mounted it to the inside of the cabinet. It runs Linux Mint and MAME 2.4X and is not connected to the internet. It boots when it receives power and a script automatically runs MAME on startup and shuts down as soon as MAME is exited.  I even added MAME splash screens during boot.

Overall it is very clean and as fun to look at as play.

Saturday, December 9, 2023

Streams of Silver Booknook: Getting Started


Steams of Silver is a follow-up to my previous Crystal Shard Booknook, and Part II of the Icewind Dale Trilogy.

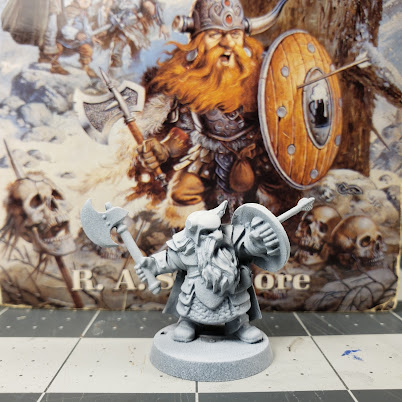
Bruenor Battlehammer

Reaper miniatures model Borin Ironbrow

Assembled and primed with clipped horn and arrow buried in shield.

Not a bad match

Skulls

We are going to need a lot of skulls...  So I bought this "big" box of skulls from Games Workshop.


Drilling one of the skulls replicates the spear nicely.

Gluing the jawbone on was not fun.

And more will hang from the tree.

Thread and super glue

Several more will adorn the tree and may more will be on the ground.

Prototype

An empty box of foam board (pinned together)

Protoype positioning

Testing out the layout and different tree models.  This tube is a good size for the tree.

Monday, November 27, 2023

Arcade1Up Coin Door lit push button mod


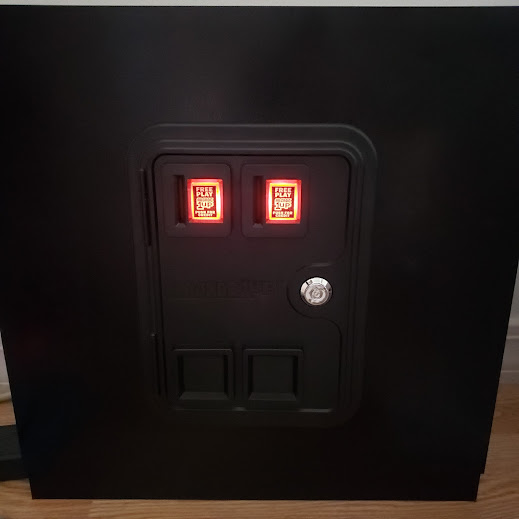
Working lit coin (return) buttons!!!

Step 1: Cutting the Holes

Remove the coin return plastic parts and replace the coin door on your panel.


  Use a sharpie to trace out the rectangles and remove the panel

I don't have a drill press so I created a jig to keep my drill straight. This is just a piece of wood pre-drilled with the same bit.

I also clamp everything tightly to a scrap piece of wood to keep my holes clean (e.g. avoid tearing the back of the panel up when the drill punches through the back side).


Before drilling with the 1-1/8 inch forstner drill bit the jig looks like this.


Step 2: Mounting the Buttons

I used these white 12V LED Buttons from T-molding.com.

Speciffically I used "White LED Pushbutton - Black Bezel" found here here.


They say they mount in a 1 - 1/8 hole.  But they are quite a bit smaller and at first I was disappointed. However, this is actually a VERY good thing for this application as you will see in a moment.

Mount the buttons in the holes using the black mounting washer to raise the button off of the surface of the panel. If you do not raise the button off the surface in this way, then the coin return button will travel too far and fall out of place.

Then loosely attach the buttons in the rear and re-mount the coin door with the coin return buttons sitting loosely in in place (without any screws holding them).


And this is the point where the over-sized holes helps you. shift the position of the button within the hole until the coin return button sits on top of the button nicely and returns to its proper position after a button press, firmly tighten, then reconfirm the button action of the front panel.

This step can be frustrating, and if the first 4 buttons I had done had not worked perfectly, I might have second guessed the process on the cabinet I show here. But I managed to find the right spot after about 5 minutes of micro adjustments and get it tight. It works great.

Note: These buttons will never be fool proof as there is not a proper prismatic joint keeping them in place. So you absolutely can push them too far and slide them a few millimeters out of the hole and into a "locked down" position. This will not really happen accidentally, is easily and immediately undone with a second press, and the overall feel of the buttons is quite good! 

Step 3: Hook up your buttons

Since the coin door is far from the other buttons, I opted to just use another USB joystick encoder to keep things clean and modular.

And the power required for the LEDs I used is 12V so this works automatically with power split off from the A1Up cabinet's power supply.


The completed cabinet!

Happy building and enjoy!

Sunday, November 26, 2023

The Demon of South Hollow

I finally broke out Four Against Darkness again and ran a quick dungeon to get reacquainted with the rules (not hard at all). What follows it the account of Thorbin (dwarf), Dantrag (warrior), Arthrallan (elf) and Brandall (wizard):

Introduction


The party has been sent to investigate tales of a nightmare fiend hunting the townsfolk of South Hollow. Actual sightings are more rare than the disappearances and remains, but those who witnessed attacks in the dark describe a grotesque silhouette with leathery wings and burning red eyes.

Ancient ruined fortifications with a sprawling underground complex are not far from town. This is the most likely place for such a beast to make its lair. Several hunting groups have come to the same conclusion and entered but none have returned. The party accepts the blessings of the townsfolk and sets out on a bright clear morning to investigate the dungeon.

The Dungeon


The entryway is quiet. Thorbin smells treasure to the left and leads the party onward.

Arthrallan the elf agrees that the healing water in the hallway fountain is a rare treasure and the party presses on.

Through the next door the party is surrounded by the animated skeletons of another adventuring party!

Arthrallan shatters a skull with an arrow, Dantrag crushes three with a massive sweeping stroke, and Thorbin cuts down the last one.

It appears these skeletons were recently picked clean by something... And that question is answered in the next room where a swarm of fat rats threatens to envelope the party (15x).


The rats are vanquished without incident.

Choosing the North door takes the party through an empty room to another room with a healer. None need his services, and he is directed to the exit along the path which was just cleared.

Moving through another two empty rooms at the top of the dungeon, the party turns South and encounters some hobgoblins. [I actually bought some retro style Hobgoblin models from Reaper for exactly this purpose.  I need to paint them!]

One of the hobgoblins was carrying a staff of sleep which Brandall the wizard is quick to pick-up.

Moving through two more empty corridors. the South path connects back to the already explored part of the dungeon. Turning East is a branching corridor where the party is not surprised to find a small band of goblins.


And more Hobgoblins in the next room.


Moving North, there is a massive room filled with orcs. Brandall is ready with an epic sleep spell, but it completely fails and Thorbin is lightly wounded in the exchange with the orcs.


Not wanting to leave a room in the middle of the dungeon unexplored, the party turns West and encounters a statue in the hallway.

The dwarf smells gold in the area and searches the statue. Suddenly the stone statue is a hulking jet black crimson eyed gargoyle which rakes two razor sharp talons at Dantrag and landing with one of them!


The narrow corridor allows Arthrallan cover to draw and shoot his bow over the dwarf, and he does with great effect. Brandall senses the magic resistance in the creature and lifts his lantern high to help the only way he can.

It is then that Thorbin lands a mighty blow with his two handed battle axe, sending the creature reeling backwards. But the gargoyle recovers with a supernatural speed borne of its magical nature and is immediately on top of the dwarf raking painfully with both claws.

Seeing the exposed flank, Dantrag lunges at the gargoyle with his sword and runs it through. And with that the combat is over as suddenly as it had begun.

On his feet now, Thorbin digs up a small cache of gold from behind the statue base while Brandall gives a small dissertation on the nature of gargolyles. This mighty gargoyle bares the marks of being in the service of an evil sorcerer and no doubt the gargoyle was the boss of this dungeon. The gargoyle likely called upon his master to animate the undead skeletons encountered near the entrance, and was gathering the goblins, orcs, and hobgoblins for some kind of larger conquest in the service of his master.

Epilogue

The party exited the dungeon without any further encounters and the the full map is here.

It is likely that had I played the rules correctly, the statue monster "Boss" was not supposed to be the "final boss" monster. It was not encountered in a room and not actually from the boss tables...  However, I did check if he was the final boss and after rolling a natural "6" I was not about to back-track on my decision. And I think I ended up with a decent story as well.