Saturday, December 30, 2023

Arcade Update

New Marquee

The new marquee for Golden Axe arrived today from Szabo's Arcades. The blacks are deep and it no longer looks washed-out. Really I would not really notice or care, but the custom marquee on the Contra cabinet motivated me to upgrade this one as well. 

After

Before


New Cabinet

And my office arcade is now Komplete with the addition of Mortal Kombat II.


I still have some minor modifications to make to Mortal Kombat II such as replacing the buttons, joysticks, and adding lights to the faux coin door.

Thursday, December 28, 2023

Streams of Silver - Completed Diorama


Looking done!

Basing the Terrain

The terrain was base coated with a black paint and Mod Podge mixture. The Mod Podge stiffens up the foam and the the black paint lets you see what is coated and makes certain that any deep recesses you might miss when painting later a forgiving black color.


Then coating the near field flat surfaces with PVA glue and adding coarse sand adds the missing terain details.


Once that is dry, the sand is sealed to the base with the same Mod Podge and black paint mixture. 

Painting the Miniature

Breunor Battlehammer was painted up to match the cover art as best I could.

I used Army Painter Speed Paint where I could:
  • Gravelord  Grey = Armor, helm, axe head, and shield
  • Hardened Leather = Wood details (axe handle and shield)
  • Fire Giant Orange = Beard
I highlighted the metal parts and finished the rest of the model with a random mixture of acrylic paints (Citadel, Vallejo, and Master Series Paint) and washes.


Too bad we don't really see this side

Going to have to go back and fix those eyes!

Battle worn shield (sorry no free-hand foaming mug standard)

Skulls

And it was finally time to hang the skulls, plant the spear, and drop a bunch more on the ground.
 

The ropes are made stiff with super glue and the skulls do not swing but vibrate a bit if knocked. 

Finishing & Painting the Terrain


The ground surfaces were quickly spray primed white and the background rocks were painted with a blue grey, washed, and highlighted with white (no snow sprinkled there).

The near field is a grey washed stone, highlighted with white and topped in spots with Woodland Scenics "Soft Flake Snow SN140"

Skulls and ropes paint up very quickly with just an earth shade wash.

Adding the Miniature


Bruenor was finally placed and green stuff (AKA kneadatite) was used to fill the gaps and make some uneven stone.


Then painted to match and covered with too much snow :(


The Final Diorama

At this point the booknook is largely done. 


It needs a case and lighting, which are not small tasks but will be completed without much change in the final product we can see here.

Thursday, December 21, 2023

Streams of Silver - Backdrop


 I printed out the companions of the hall (minus Bruenor) and glued them to some cardboard. 

I printed this in several sizes...  this one was too big.

Then I cut them out and hit the edges with a black permanent marker.

A bit coarse, but it will look good in the back of the nook.

Cutting a slot in the far rock...  yeah, that works!

Then I painted a mountain background in similar colors to the book.

The Spine of the World

Then I assembled it by wrapping it around the terrain. Note: these temporary assembly steps are all done with sticky-tack.


The finished product is getting close!


Wednesday, December 20, 2023

Streams of Silver - Terrain


The terrain came together quickly.


Dowel and toothpick branches were added to the tree tube and a bark texture applied to all with a hot glue gun. The hot glue was applied in vertical lines and smoothed into a bark texture using the side of the hot glue gun nozzle.


The base was then lifted and shaped into a circle in the back to support the eventual smooth mountain landscape background.

The terrain was improved with what will be a forced perspective background hill and organically shaped with Sculptamold.


And in a final step, the surface hosting the miniature was built-up to make a more flat surface and conceal the base.  


Friday, December 15, 2023

Streams of Silver - Cover Plate


In GIMP, I traced the title font from a high resolution photograph (surprisingly I could not find a better image online).


Then I replaced the title on the the SVG cover file I created for my Crystal Shard Booknook and changed the color gradient to match the spine and back cover.

I printed it, glued it to some a cardboard stock (with PVA glue), and cut out the shape with a hobby knife when it was dry.

The result allows me to frame the scene properly!


Before, I was concerned about adding too much elevation to the base. Looks like I can increase the height of the foam base and bring it forward a bit as well. But it looks like there will be very little guess work from here!

Sunday, December 10, 2023

Contra Arcade Cabinet (Arcade1Up Conversion)

Over the summer I bought an Arcade1Up Simpson's cabinet and converted it to a vertical screen Contra MAME cabinet.


The Simpson's Cabinet


I got the cabinet when it was on sale at my local Best Buy for $300.  I felt this was worth it because:

  • It has a nice scale and form factor complimenting my existing Golden Axe cabinet.
  • I would not have to do any woodworking on the cabinet.
  • BOE 4:3 LED screen.
  • Lighted marquee.
  • Two yellow button coin doors (needed for my Golden Axe cabinet)
  • PCB and control panel (traded for another red button coin door)
  • Stool (sold for $40) 

Graphics

Marquee and control panel

I got this excellent custom "Slip-On" Marquee from Szabo's Arcades

The control panel graphics are from Arcade Graphix and are printed on a thick laminated vinyl which avoids the need for a custom deck protector.


The sides were lightly sanded and painted with Behr spray (lunar surface color) and a generic glossy black spray paint went over the yellow trim.

The graphics were found on Redbubble.com and looked a lot better than the silly beefcakes Konami used in their artwork. We all know this game was supposed to be Dutch and Rambo versus the xenomorphs from Aliens... so why not? I also ordered a large Contra image for the Riser (bottom Contra logo).


Screen Rotation

I used a router to cut a vertical slot for the screen in the existing horizontal mounting [Note: this is actually the screen from my Golden Axe cabinet, as I did a screen swap over there because I preferred the mostly blank bezel graphics].
To complete the rotation, I purchased a piece of lexan, cut it to match the size, drilled holes for the attachment screws, and spray painted the back-side black (after masking the viewing window).
Lexan was a good choice here (3x more expensive) but it cuts and drills very easy.
Masking the window for the screen with Blue 3M painters tape was a mistake though. The paint left a residue and I kind of micro scratched the screen cleaning it off. It looks great, you don't see it, and I'm not complaining. But I would do it differently next time.

Power Distribution and Wiring

I mounted the display control board to the back of the monitor using a 3D printed template I found on Thingiverse. This does not actually fit the board correctly, but was forced to work and screwed into the back of the monitor using some screws used on the original PCB housing and my own collection of random screws.

The LCD control board is not connected and instead two buttons on the top panel the cabinet are connected to control the output volume.
The volume buttons on the top of the cabinet

Sound is wired to use the original A1Up speakers as driven by the display board and communicated from the PC over HDMI.

A single 12V power supply provides all of the power in the cabinet. The original cabinet was 3A 12V and the mini PC was 3A 12V.  So I bought a single 6A 12V supply from Amazon.


The 12V power is distributed to the various components in the cabinet via a terminal block which can also be found on Amazon.


Control Panel


The control panel was custom built from 1/2 inch MDF and black T-molding. T-molding, buttons, and joysticks are all from t-molding.com.  Sanwa sticks with red tops, red Suzo Happ concave buttons, and white P1 and P2 buttons. The USB encoder boards from Amazon came with all of the wires used here.

The lighted coin door build is documented here. Since I swapped the dual coin doors for a single panel, I took the front panel from my Golden Axe cabinet, made the modifications and hit it with the same black spray paint.

Mini PC


I bought a BeeLink mini PC and mounted it to the inside of the cabinet. It runs Linux Mint and MAME 2.4X and is not connected to the internet. It boots when it receives power and a script automatically runs MAME on startup and shuts down as soon as MAME is exited.  I even added MAME splash screens during boot.

Overall it is very clean and as fun to look at as play.

Saturday, December 9, 2023

Streams of Silver Booknook: Getting Started


Steams of Silver is a follow-up to my previous Crystal Shard Booknook, and Part II of the Icewind Dale Trilogy.

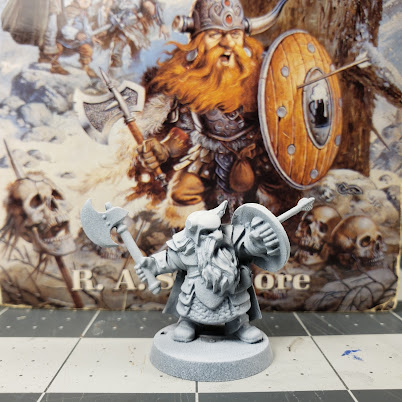
Bruenor Battlehammer

Reaper miniatures model Borin Ironbrow

Assembled and primed with clipped horn and arrow buried in shield.

Not a bad match

Skulls

We are going to need a lot of skulls...  So I bought this "big" box of skulls from Games Workshop.


Drilling one of the skulls replicates the spear nicely.

Gluing the jawbone on was not fun.

And more will hang from the tree.

Thread and super glue

Several more will adorn the tree and may more will be on the ground.

Prototype

An empty box of foam board (pinned together)

Protoype positioning

Testing out the layout and different tree models.  This tube is a good size for the tree.